Larry's Toon Institute

AWN Logo

Larry's Toon Institute Navigation Bar

Larry's Toon Institute Paintbrushes BASIC HEAD CONSTRUCTION Part 2


Obviously, not all character's heads are designed as perfectly round. In this lesson, we will explore how to create more complex character head construction.

By adding to our basic forms either above or below the eyeline we can develop more character designs.

Please see the BASIC HEAD CONSTRUCTION PART 1 if you are unsure of the term eyelines.

Lets create a more complex character!


STEP 1


We can accomplish our task by adding to the ball shape below the eyeline - a combination cheek and jaw line - which extends from one side of the eyeline to the other side of the eyeline.

Note examples 1-5. Each begins with a ball and eyelines and centerlines.

Here, we play with different cheek and jaw lines

HINT: This cheek/jaw line comes in handy for squashing and stretching the cheek/jaw line during lip sync (dialog).


STEP 2


We can combine both the cheek/jaw line with a snout to create even more complex characters.

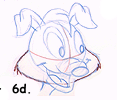
Lets take LaMatt the dog and construct him.

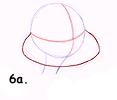
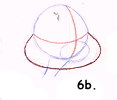
Again, we begin with the ball, eyeline. centerline and cheek/jaw line.
Next we add a 3D form for the snout.
Then we draw in the eye sockets and a nose.
Finally we complete LaMatt by adding a mouth, ears and fur and other assorted details.

KEEP THE FUR SIMPLE AND WELL DESIGNED.

REMEMBER: DETAILS ARE ALWAYS ADDED LAST.


SUMMARY

  • Always use 3d forms as a basis for characters.
  • Draw in your eyeline and centerline.
  • Add above and/or below the eyeline to creat more complex characters
  • Try combining the cheek/jaw line with the forms of a snout
  • DETAILS ARE ALWAYS ADDED LAST


[ RETURN ][ TOP]


All images copyright © Larry Lauria, 1999
Web site design and programming by
Robyn Urcuyo-Siani